Showing posts with label rc. Show all posts

Friday, September 12, 2014

Making a Video Out / OTG cable for Mobius Action cameras

Imagine my sadness when my brand new Mobius turned up the other day and I realized I'd forgotten to order a video out cable to use it with FPV. So I did the obvious thing, I made one and here's how I did it. 

1. Firstly you need to realize what an OTG (On the go) or video out (the same thing) cable is. Its simply a mini or micro USB cable with pins 4 and 5 connected. This is used like an internal switch to the device to alert it that in needs to send video out on the cable rather than act like a mass storage device or what ever else it does.  A normal USB cable the plus into your computer only has 4 pins in it so there will only be 4 wires going to the mini or micro end of the USB cable that we're going to be modifying. The 5th pin is the ground pin and is the one on the right as you look at the USB cable with the larger flat side facing down. You'll see what I mean in the pictures. So get you're self a Mobius to test your new cable with and get cracking. 


2. You'll need a mini USB cable. Just cut off how ever much you think you'll need.


3. Strip back the wires and pretin them with solder to be used later. Get that pesky shielding out of the way too.


4. Cut off the outer casing around the USB plug. Don't destroy it but rather cut a neat line down one side like this.


5. Remove the little metal housing around the plug by gently bending the side tabs outwards until the two pieces come apart.


6. Remove the bottom plate of the mental house not that it is separated from the top plate.


7. Now the hard part. You need to short out that black wire with the connection next to it. You can do this in two ways. Either you can solder it to the tiny little metalic stub on the back of the pin header where the wire comes out (like I did) or you can simply try adding a tiny bit of solder to the flat pins them selves (up at the base) to short them that way. I've done both and I would probably recommend the second way as its easier.


8. Check the connection with a multimeter to make sure that the pins 4 and 5 are indeed shorted out replace the metallic housing along with a little glue for strength. Epoxy works well for this. Make sure the pins that will go into the camera are flush up against the end of the housing (like it was before you took it apart).


9. Replace the plastic cover with a little more glue.


10.  A bit of heat shrink to hold it all together and job done. Now you can connect up you're video transmitter and give it a test. In the case of the mobius video out come out on pin 2 but don't forget to connect the ground pint as well to your vtx or you won't get any signal.

RC Man Child Store Review and Igniting an ESC

Recently I purchased some motors and ESCs from RC Manchild. I purchased the following gear. 


This was for a new quad I was building to be able to lift a Gopro and DYS 3-axis gimbal and hoefully be efficient enough to get decent air times with a 6S 4500mah battery configuration. 

It all went well until I flew it. You see I put 14x5.5 props on because that is what I'd seen someone on YouTube doing and figured that it would be perfect. However what I hadn't figured into the equation is that the YouTube video I saw was shot at 7000 feet elevation in the mountains of Utah. 

So when my quad took to the skies for the first time the result is seen below. 


The ESC literally caught first as it was drawing so much current.

Well I contacted RC Man child and got by far the very best customer service I've ever had. Not only did Don (the owner) reply to my emails incredibly promptly, but he helped me work out why it blew up, recommended some better props (these ones) and gave me a new one free of charge. Even though it was entirely my fault for destroying it. He even offered to give me a new motor if I'd managed to cook the existing one, which luckily I hadn't.

Very quickly he had the new ESC on its way along with some new props I purchased and they been working incredibly well even since. This quad gets 20+ minutes of the 6S 4500mah power pack while hauling around the GoPro and gimbal.

One more thing I'll mention from the RC Man child store is this little power distribution board. Its fantastic because not only does it provide and easy way to hook up your ECSs to the main power pack but it also provides a clean 12v output for running a gimbal and another clean output which you can vary depending on your needs. For example it could output 5v for power a second Rx for the person operating the gimbal in a two pilot setup.

Well the conclusion is a simple one. So far I've found RC Man child to be a fantastic company to deal with who sell a quality product and have awesome customer service. And finally make sure you look up what size props to put on your motor/ESC comb so you don't building a flying flame thrower like I did.

Battery Plugs: Deans Vs XT60

I've been a life long user of the Deans battery plugs but recently having been fed up with them I switched to the newer XT60 style.


Here's my thoughts on each of them.


Deans


Pros: Never going to unplug them selves. Very strong connection and can easily transport a lot of current with out heating up. They also have little grip lines on the side to make them easier to pull apart.

Cons: You'll need super human thumbs to take them apart. Because of this the solder on the terminals tends to get a lot of strain put on it and eventually crack. They are not the cleanest or easiest so solder either. The worst thing about them though, is that they are very hard to plug together and you end up with a bunch of arcs and sparks as you try to join them. Not really good for your batteries or the electronics you're powering up and down several times while you try to plug them in.


XT60

Pros: Very easy to plug together and don't cause current surges while you try and plug them in. Very secure and won't come apart on their own. Very easy to solder. Have little + and 1 symbols on them so you don't accidentally solder one backwards.  Hobbyking batteries come with these plugs on them. They are very cheap to buy packets of them.

Cons: Can be difficult to unplug but not no where near as bad as Deans.


Conclusion: Well its pretty clear from the pros and cons lists above that I have become a big fan of the XT60 plugs. I've used the Deans for a long time in all kinds of flying contraptions but I've become a very big fan of the XT60 in a very short time. The only downside is changing all the batteries and ESCs over, but as I quite enjoy soldering, that's not so bad. 

Monday, September 1, 2014

Battery Strap Reviews

It seems to me that there are two main types of battery strap out there for purchase. There is the name brand ones like Turnigy and DJI and then there's the generic ones from places like HobbyKing. Well here's my point form review of each of them two main types.


First up we have the more expensive name brand straps like this Turnigy. Turnigy claim that these provide better grip and don't turn to fluff eventually after a lot of use. Well that might be the case however I've found that they are also very hard to use. Sure they have a nice grippy surface but they are much much harder to tighten. I want my battery straps to really hold things and these ones just don't do that very well. You can't pull the strap back on its self to tighten it so you end up just having to tighten it as much as you can and hope it holds. Also because the hook and loop stuff (it's not Velcro because that's a brand name) is finer you kind of get the feeling that it wouldn't take much to pull it off at the right angle.


Now compare the above findings to this strap. Its from HobbyKing and has no brand at all. That's really saying something considering some of the things they have branded there. Its also less than half the price of the name brand straps. However its got this brilliant little plastic loop which allows you to tighten the strap back on its self and make it as tight as you want. Also the hook and loop stuff really grips. I can see that over a very long period of time it might look some of its holding power but realistically at eighty cents each I'd rather replace them and have the ease of use and peace of mind knowing my batteries aren't going to fall off midair coz lets face it, that's very bad.

Friday, June 27, 2014

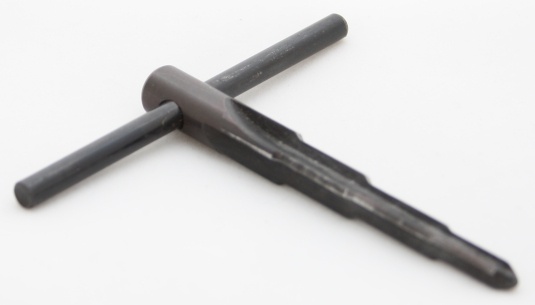
Reaming Props The Fast Way

So if you're at all like me, you've probably bought some cheap props online and at some pointed needed to ream them out to make them fit on a multirotor or some such. So here's some of the approaches I've tried and the levels of success I've had with them. 

1. Drill: Don't do this. It seems like it would be perfect but the problem is that the tapered cutting edge of the drill grabs and pulls its self though the prop and will certainly not go through straight. I've done a few tests and even clamping the prop down doesn't help. If you can get a straight hole drilled with one of these you know something I don't. 


2. Prop Reamer: Right so this is what you're supposed to use. However I've bought a couple of cheap ones online and they just don't work. I couldn't ream out a cheese prop let alone a nylon or even carbon fiber one. 


3. Step Drill: I found one of these down at my local hardware store and thought I've give it a try. Turns out, Its awesome! Because it doesn't have a tapered cutting edge it doesn't pull its self through the prop. You can simply bore it out all the care and attention you need to make sure you do it straight. Also because its being operated by a power drill and its really sharp it will ream out a prop made of pretty much anything really nice and fast. So it may not be what the pros recommend but its sure worked for me. 


Note: If you have any other ideas or experience put them in the comments and I'd be glad to include them in this list of prop reaming tools. 

Thursday, June 26, 2014

FrSky Taranis Speaker Upgrade

At this point I think I've seen more of the inside of my Taranis than the outside. So here's another Taranis mod; not really a very important one but a simple one. The internal speaker of the Taranis isn't really the nicest thing to listen to so I thought I'd put a better one in. I found a little 1 W 8 ohm 36mm speaker on eBay for about $4 which is a bit bigger than the one in the from the factory but it will still fit with the help of a little hot glue. So here's the steps.

Step 1.
Open the Taranis up and unplug the stock speak and pull it out. Here's mine next to its replacement.


Step 2.
Now unsolder the connectors from the stock speaker and solder them onto the new one.


Step 3.
Trim off the little studs around the speaker mounting ring.


Step 4. Apply a little hot glue to mount the new speaker and plug it in.


Step 5.
Put the Taranis back together and fire it up!

Friday, June 6, 2014

FrSky Taranis Antenna and Sliders Upgrade Part 1

Well if you've read previous articles on this blog you'll know that I can't seem to stop modding my FrSky Taranis. It really seems to lend its self to modification. I've got some more planed as well.

Enough of that though, here's how to upgrade the main antenna of the Taranis and also the sliders. You might want to upgrade the sliders if you bought one before about February in 2014. Until that point they were shipping them with really cheap and nasty feeling sliders on the sides but fortunately you can buy the new sliders from places like Aloft Hobbies pretty cheaply.

Step 1. Things you'll need.
1. A pair of new sliders
2. A 5dB Omni Direction Antenna or A 7dB Patch Antenna
3. A coax cable (I would order this longer one because I ended up cutting the shower one too short and having to use another cable I had lying arund


Step 2. 
Open up the Taranis by removing the screws in the back and take out the sliders and switches at the top left and right. Be careful unpluging these from the main board as they are quite tight. I used a knife to get in and loosen the catches. 


Step 3.
Remove the hot glue blob over the soldered joint with a knife.Mine came off rater worryingly easy.  


Step 4.
Unsolder the coax cable for the antenna that's already there and then remove the main antenna. This will just slide up the top of the Taranis case as long as you use some pliers to squeeze the base of it so the little lugs come free.


Step 5.
Clean up the joint where the cox cable will be soldered on and add a little solder to the ground plates which are the two larger joints beside the little one in the middle which is the what the core wire will be attached to.


Step 6.
Get your coax cable ready. I cut off the little connector because I really don't think i'll be needing to change the connector any time soon so I just prepared it for soldering by feeling back the metallic shielding on the outside and making it into two wound strands which I've covered in solder as well as a little on the core strands to make them easier to connect to the board. 


Step 7.

Hot glue the coax cable into the hole where the old antenna came out of. I put a little bit of scrap wood underneath the hole to stop the glue from running down into the Taranis body


Step 8.
The coax cable hot gluded in place. 


Step 9.
Solder the outer shield joints to one or both of the outside connectors on the board and solder the core wire to the active connector on the board (the one in the middle)


Step 10.
Place a bit of hot glue (and do a better job than they did at the factory) on the joint for the coax cable.


Step 11.
You'll need to take the switches out to remove their wires and plug into the new ones which are attached to the new sliders. 


Step 12.
Put the new sliders back into the case, put the switches back in (make sure you didn't turn them around or put the back in the wrong side) and you're done. :)

Some notes:
One thing which I'm still investigating and testing is that SWR values with the new antennas are a bit higher than they were with the original stock one. I've read on the OpenTx website that this isn't a problem as long as it doesn't go about 50, however to my mind its still indicative of an imperfection somewhere so I shall keep investigating and make some more posts when I work it out.

Saturday, May 10, 2014

FrSky Taranis Antenna Mod

So the FrSky Taranis is an awesome radio but with a little modding you can make it even better. Due to its ability to to use both its internal FrSky module and another one in the port on the back it has amazing flexibility. The only problem with using an external module is the fact that the antenna sticks out the back and won't let the radio sit flat on its handle. It also gets in the way when you try to carry it by the handle.

So here's what I did....


1. Take the module out of the radio and also take the battery out so you don't short anything out.


2. Unscrew the six screws in the back of the radio and open that puppy up. Always a little scary I know but this radio is designed to be opened up so you can change the mode if you want to.


3. Open up your module by unscrewing the antenna and the four screws in the top. I'm using the ORX DSM2 module from Hobby King so I can fly my Nano QX and my old foamies with this radio. The little antenna cable you here see I got from eBay for a few dollars. Just get a RP-SMA antenna cable like this one from an electronics store or eBay.


4. Put the module shell back in so you can drill through into the inside of the Taranis like I've done here. The hole just needs to be big enough for the small end of the cable to go through. Be careful when you drill through that you don't hit anything inside the Taranis. If you drill through here like I did you should be fine.


5. Now drill a hole in the top of your Taranis. This can be anywhere you want the second antenna to be mounted. I put mine up here behind the main antenna. The hole needs to be just big enough to put the big threaded end of the RP-SMA connector through with out letting the whole thing (the collar and nut) fall through.

6. Put the big end of the cable though the big hole and the little end through the little hole. Once you've got the big end though, put the washers and the nut on the top to stop if falling back into the Taranis.


7. Connect the little end of the cable to the board in the module and put the board back in the module case.


8. Close the module up and put it back in the case. You can close the hole left by the antenna with some tape if you want.


9. Screw the second antenna onto the SP-SMA cxonnector and close the Taranis case. One thing to note when putting the screws back in. If you don't hold the two halves together the screws won't grab in the front half and they will push it open. So just keep the two halves held together while you do it. Also make sure you put the top two switches back in the right way, brown wire to the top (like all the others).


10. All done!

11. It works :)

Sunday, April 20, 2014

Lipo Conversions Part 1


If you're into RC at all you're mostly likely know what LiPo batteries are. If you're not have a look here

Having a whole load of these batteries in my garage I've discovered that you can do a whole lot more with them than power RC aircraft. 

So my first LiPo conversion project was to resurrect my trusty battery drill. Its a great drill however it suffers from the same problem that a lot of battery drills do in that if you don't use it all the time the batteries die eventually and also the batteries take a very long time to charge. So I converted mine to run on Lipos and now it not only charges much faster, but I can buy very cheap replacement batteries for it when ever I need to and charge it with my Lipo charger instead of the big bulky charger it came with. 

So here's how to do it. 

Step 1 - Battery Selection.
You'll need to open up the battery that comes out of the handle of your drill and have a look (or measure with a multimeter) at much much voltage the battery supplies. Then you can buy a lipo to match. In my case this was a four cell 1.3 amp hours battery by Turnigy. Its also Important to take into account what the maximum discharge rate that battery will be subjected to is and make sure you get a battery that can handle that. I'm not exactly sure what that is for my drill so i got this 45-90 C discharge batter from HobbyKing for $13.50. The final thing to consider is a battery that will fit in your drill's battery casing. Don't get one too big or it won't fit and you'll be up a certain creek. 

Step 2 - Solder up the connectors 
Once you've got your battery ready to go you'll need to solder the connectors from the battery casing to a plug that will match what ever kind of battery plug you use. I use deans so that what I've connected here. You can work out which is the positive and which is the negative terminal by looking at the old battery you've taken out and seeing how it was connected. 
 

Step 3 - Insert Battery
Once you've got your connectors soldered up you can put your battery in side, plug it in and put the whole thing back in the drill. One mod you could do which I didn't, was to solder another battery connectors outside your battery casing so you can charge it with out taking it out of its case. I simply unscrew the case and take the battery out when I want to charge it. I've actually got two so I just swap the battery over and put a new one in while I charge the flat one.